Intro
My girlfriend's laptop decided to act up… When moving the cable around the charging was being interrupted. First thought - broken cable, but no… It’s worse - broken power jack on the motherboard.

Video
[youtube=http://youtu.be/u\_JsHYMJ7No\]
Text transcript
Opening the case
The first part of the dis-assembly is quite simple: remove the cover that protects the RAM, HDD and WiFi module.

Hard disk comes out quite easily as well.

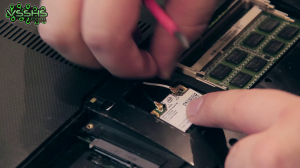
So does the WiFi Module.
To remove the body of the laptop a lot of screws need to be undone. I just followed them from one side and removed them one by one.
Please note, there is a tiny screw in the HDD hole. Without removing it it’s impossible to open up the case. Other tricky place is below the battery. There are two screws there.

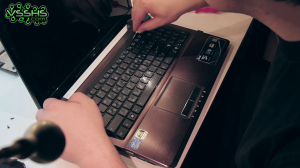
Now it’s time to remove the keyboard. One just needs to touch the tabs at the top while lifting the keyboard up gently and it pops out. A wide white ribbon cable needs to be removed before removing the keyboard completely.
And then all the screws can be accessed and removed. One of those screws hold the DVD drive. There are three sneaky screws hiding under the drive.
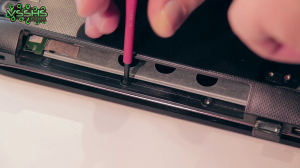
After using some percussive maintenance and removing a screw or two that I missed, the top cover finally gave in.
Removing the motherboard
To remove the motherboard first gently disconnect the display cable as well as the speakers. There are no tabs holding them, so they just pop out.

Remove the tape, lift up the tab and remove the cable connecting USB hub and the audio jacks. There are 5 screws holding the motherboard, but they are all marked with small white arrows.

Replacing the connector
Now the fun part. Here you can see the broken one as well as the new connector from ebay.

To desolder the old one I am using a desoldering pump that I got from eBay. It costs only 10 bucks but it works like a charm. Just let it heat up and suck away.

A few pins did not want to give up, so I just used some pliers and it gave up. After cleaning up with some solder wick the board is ready for the new connector. Some solder and it looks like new.

Putting it all back together
To put it back together I just followed the dis-assembly in reverse. Motherboard with its 5 screws, then the cables, the lid. After putting on the lid I carefully connected the power button ribbon cable as well as the mouse-pad one. It is important not to forget the three small screws before putting the DVD drive back in. And the one under the HDD. After putting the keyboard back in it’s place the ribbon cable needs to be connected before closing it up.

It all works now! Time for a coffee.
© Vaidas Sirtautas.RSS